I MUST HAVE PIZZA!!(Ok maybe a little melodramatic, but, still, I really must.) I love pizza. My last meal: pizza. Stranded on an island: pizza. Who I love more, you or pizza: probably… you get the point. (I kid! I kid! I love you all!) However, in my quest to finally feel comfortable in my skin again, pizza, in the traditional sense, just isn’t something I can have as often as I would like. So, I make quite a few healthy variations of pizza. Today I will tell you all about the Zucchini Pizza!
Now, I am a giant fan of looking stuff up on that amazingly helpful search engine we all know and love. I have done that, and found a lot of ideas from other people, but I think I have some tips that make the difference. I have made these quite a few times and they weren’t always great. I’ll tell you what I’ve learned, from trial and error, and maybe you won’t have to make the same mistakes. I’ve made a handy photo with each of the steps, in case you’re a visual learner. Ha
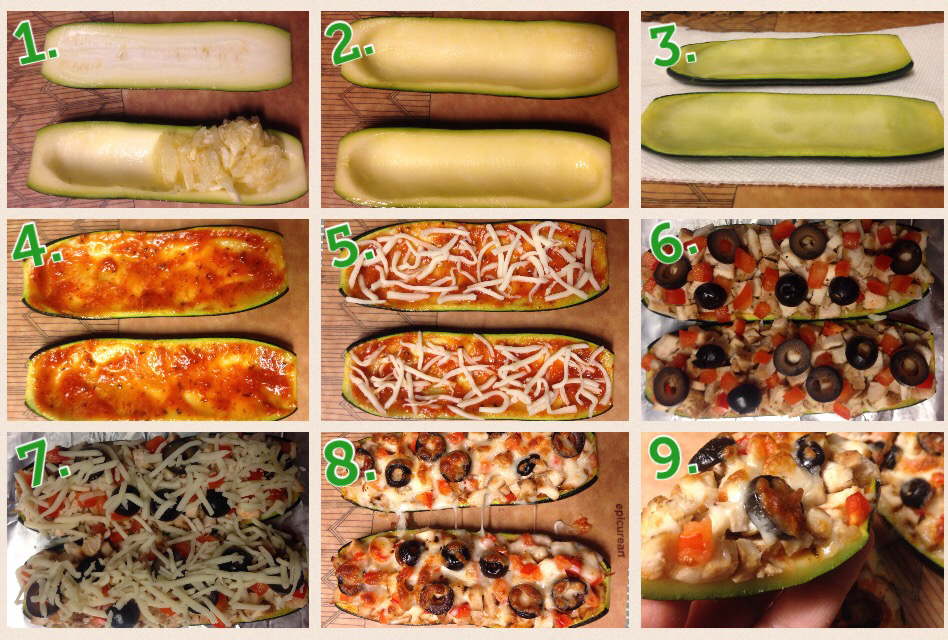
Step 1. Cut the zucchini in half length wise and scrape out the center so it’s kinda like a zucchini boat. Think ‘pizza crust’ when your scraping. This is one of the first mistakes I made. I left the zucchini much too thick and it didn’t give me that “pizza” feeling. It gave me a “zucchini with toppings” feeling (And an undercooked one at that). Making the zucchini thinner will help it to resemble more of a pizza crust and it will allow the zucchini to cook through and be tender, not crunchy.
Step 2. Your ‘crust’ is scraped out. Now cook it. I can’t remember if I ever read about this step from someone else or not, but I think it’s important. To make sure it is nice and tender, and in order to complete step 3. I usually cook mine in a toaster oven. I only use the ‘toast’ feature. This is part of the reason I love this pizza. It’s just so easy. It depends on how big/thick your zucchini is, but I think I usually toast it about 7-8 min. You want it to be soft enough that when you push the sides of the ‘boat’ down you’re able to push them flat. (Of course you don’t want it mushy, so keep an eye on it, everybody’s ovens vary.)
Step 3. This step is important, but please practice caution, my friends. When you take the veg out it will be hot. Please let it cool a bit because this next step will burn you if you are not careful. Trust me. Lol. Once it has cooled a bit, fold up some paper towels (kinda thick), and squish it! Yes, That’s right, push down on it pretty good and squish that excess water out. Sometimes you will get more water out than others, but I wouldn’t skip this step. It keeps your toppings from hanging out in a watery boat and it flattens the zucchini for more surface area for your toppings.
Step 4. The sauce. I like to go light with this, but going heavy is probably fine, just messy.
Step 5. The cheese. When I think pizza, I think; crust, then sauce, then cheese, then toppings. But with the zucchini pizza I use the majority of my cheese on top. Why you say? Because there is not a lot of surface area on here for toppings. With my nutrition goals I need to eat protein! (Thank goodness for my shakes!) Its not always easy for me to get in as much protein as my awesome trainer wants me to consume. That being said, I need to try to cram 4oz of chicken on two little halves of zucchini, so I use the cheese on top as my ‘glue’ to hold all my toppings on. Thus, the reason for very little cheese at step 5. Of course people can do what they want with their cheese and toppings. This is just a tip in case, like me, you may need to use your cheese for ‘glue’, Don’t put it all on after the sauce, like any right minded pizza lover would. (I know people like pizza all different ways. I’m just kidding. 😉)
Step 6. Toppings!! Of course this is a preference thing. I happen to love these three toppings. I love chicken. I love the red bell pepper for the crunch and I love the olives for the saltiness. Get crazy! Do whatcha like.
Step 7. Cheese ‘glue’! This is the key to my toppings staying on so I can eat it with my hands like you usually like to eat pizza. I have a few tips here: •Use nonstick foil. (I weigh my ingredients to accurately record what I’m consuming. I’ll be damned if I’m gonna lose a 1/2oz of cheese because it’s crusted on to the foil! Lol. Maybe that’s just me. Can you tell I love cheese?) •Add your cheese after you have put your pizzas on the foil. (You’ll never transfer it onto the foil without losing a bunch of cheese and/or toppings.) •If you push the zucchini halves right next to each other it helps prevent topping loss.
Step 8. It’s cooked. Everybody’s ovens vary, so I think you guys are on your own for this one. I toast mine for probably another 7-8 mins.
Step 9. Enjoy. (Note how thick the “crust” is in this pic. For me, perfection.)
My Zucchini Pizza had:
1 zucchini
1/2oz Pizza Sauce
1 1/2oz Mozzarella Cheese
4oz Chicken
12.5g Red Bell Pepper
3 Olives
237 calories, 32g protein, 5.6g carbs, 8.9g fat
I hope you give one of these pizzas a try. If you love pizza and you are watching your waistline, they really do help curb your pizza craving. They are surprisingly filling and they are good for you!
Alright so I have to admit it has never crossed my mind to make a zucchini pizza crust. And I am sure I have scrolled past something in the deadly Pinterest app but never thought to try. I am so doing this. Thanks for the idea!